Publishing & Sharing
Once your event is ready, publishing it makes it live on the internet with a unique sign-up link that anyone can use — no Village account required.
Publishing your event
Section titled “Publishing your event”There are two ways to publish an event:
Event Form
Section titled “Event Form”https://app.usevillage.app/events/createAt the bottom of the event creation form, click Create Event. Your event goes live immediately and you’ll see a confirmation.

Event Draft Edit Form
Section titled “Event Draft Edit Form”https://app.usevillage.app/events/edit/[event-id]If your event is saved as a draft, click Publish Event at the bottom of the event draft edit form. Your event goes live immediately and you’ll see a confirmation.

Event Draft Mode
Section titled “Event Draft Mode”https://app.usevillage.app/events/[event-id]If your event is saved as a draft, click View Event to open it from your Events list. Look for the yellow draft banner at the top of the page. Click Publish Event to make it live instantly — no need to go back into the edit form.

Your event’s public link
Section titled “Your event’s public link”Every published event has a unique public URL:
https://app.usevillage.app/event-signup/[event-id]You can find and copy this link in two ways:
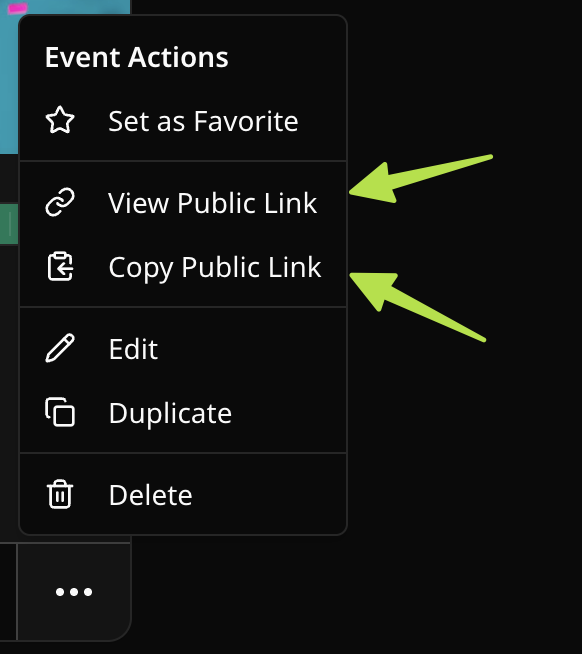
- Open the event actions elipsis (…) menu on any event card or event detail page
- Click View Public Link to open the event page. Copy the url in address bar.
- Click Copy Public Link. to copy the link to your clipboard.
What attendees see on the public page
Section titled “What attendees see on the public page”When someone opens your event’s public link, they see:
- Your event’s cover image and color theme
- The event title and event type
- The date and time (with end time, if set)
- The full description with all of your rich text formatting
- For Standard events: the number of remaining slots (if the event has a slot limit)
- For Appointment, Volunteer Shift, and Bring an Item events: a slot picker showing each available slot as a card — attendees select one before filling out the form
- Your sign-up form
- Your organization name and logo Organization
- A list of attendees by first name — grouped by slot for slot-based events — if you’ve enabled Show attendees publicly in the event settings
Slot availability
Section titled “Slot availability”Standard events
Section titled “Standard events”The public page shows a live count of remaining slots. As people sign up, the count decreases in real time.
When all slots are filled, the sign-up form is automatically replaced with an “event is full” message. No action is needed on your part.
If someone cancels or you remove an attendee, their slot is immediately returned and the form reopens for new sign-ups.
Slot-based events (Appointment, Volunteer Shift, Bring an Item)
Section titled “Slot-based events (Appointment, Volunteer Shift, Bring an Item)”Instead of a single slot count, attendees see a slot picker — a grid of cards, one per slot. Each card shows:
- The slot label, date, and time (Appointment and Volunteer Shift)
- The item name and quantity remaining (Bring an Item)
- A live availability badge (e.g. Available, 2 left, Last spot)
Attendees click a card to select their slot before filling out the sign-up form. Full slots are grayed out and cannot be selected. If every slot is full, a message is shown and no new sign-ups can be submitted.
As with standard events, availability updates in real time — no refresh needed.
Event status
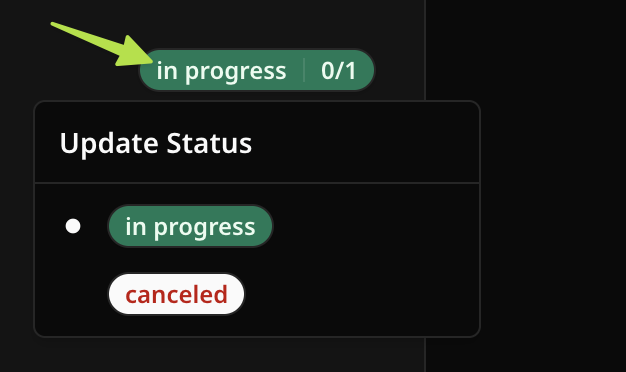
Section titled “Event status”You can change your event’s status at any time. Status options are:
| Status | What it means |
|---|---|
| In Progress | Your event is active and accepting sign-ups |
| Canceled | The event is canceled — the card is visually de-emphasized |
Events that have passed their date are automatically displayed as Completed in your dashboard with a grayed-out appearance. No action is required.
To change the status, use the Event Status selector on the edit form or the event status badge on the event.
Editing a published event
Section titled “Editing a published event”You can edit any event detail at any time after publishing.
Duplicating an event Organization
Section titled “Duplicating an event ”OrganizationTo reuse an event as a starting point for a new one, open the event actions elipsis (…) menu on any event card or event page and click Duplicate. Village creates an exact copy of the event and opens it in the editor as a new draft for you to customize.
Deleting an event
Section titled “Deleting an event”To permanently delete an event, open the event actions elipsis (…) menu and click Delete. A confirmation dialog will appear before anything is removed.
Marking as a Favorite
Section titled “Marking as a Favorite”Click the ⭐ star icon on any event card to favorite it. Favorited events appear in the Favorite events section at the top of your Dashboard for quick access. Click the ⭐ star icon again to unfavorite.